August Whiplash: Jumpah

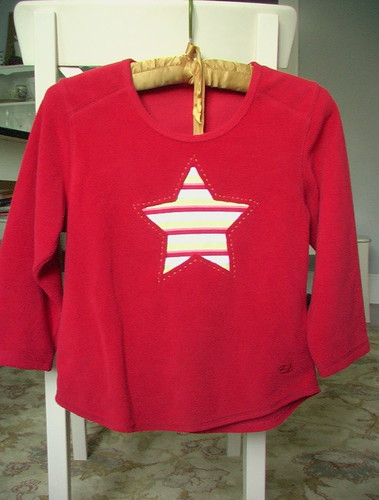 The Mini Boden catalog arrived at our door filled with all sorts of cute, easily craftable kids clothing. I got the idea for this reverse applique jumper (Aussie word--that way I don't have to say "sweatshirt" or "fleece". I think.) from this Mini Boden top. I know I'm not the only one out there admiring the Boden either. See wise and ask the sky for other inspired applique.
I'd feel a little presumptious calling this a tutorial, given that the technique is so simple, but in case you're wondering exactly how I did it, here is a "Discussion of Methods Used".
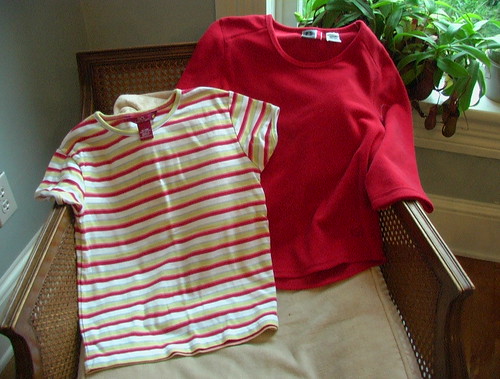 Get 2 shirts that look good together. They should be made of a stretchy material like cotton knits or fleece. The "primary" shirt will be the one that remains mostly uncut, and the secondary shirt will be the one used for embellishment.
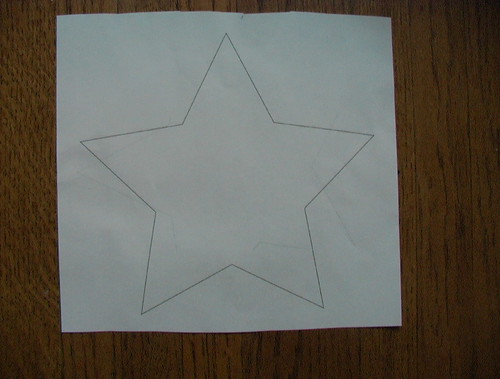 Find a motif. I chose a star because it's a cool, simple graphic and it's easy to maneuver through the sewing machine. I have another kids' sweatshirt I want to do this with, and I'm planning on using a deer motif. Challenging. You can choose anything you want. Print the motif on paper to the desired size.
- Turn the primary shirt inside out. Cut off the front of the secondary shirt and lay it on top of the primary shirt's front with the right side of the secondary shirt touching the wrong side of the primary shirt.
 Place your paper motif just where you'd like it on top of the secondary shirt and securely pin through all three layers (primary, secondary, and paper motif). Be careful not to catch the back of the primary shirt!
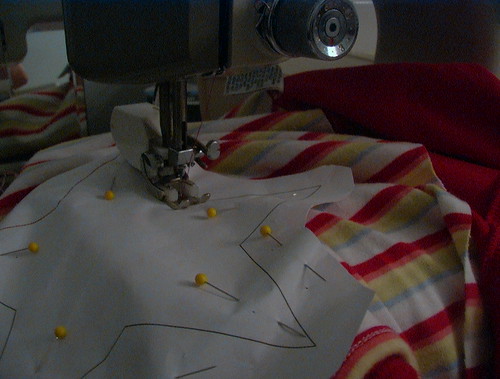 Set your sewing machine to a small stitch. Stitch all around the border of your motif.
- After sewing, you will find that the paper has been nicely perforated, and it will tear away easily from the stitching. If it sticks in a few places, you can gently loosen it but running a seam ripper along the stitch line. Snip off extra secondary fabric around motif on wrong side of shirt leaving about a half inch.
 Now for the fun part. Turn the shirt right side out. In the center of your motif, pull the primary afbric away from the secondary fabric. Carefully cut into the center of just the top fabric. Cut a quarter-inch away from the stitch line all the way around your motif. You will be cutting away the primary fabric to reveal the secondary fabric underneath. Amazing!
- Embellish with decorative stitching or whatever.
posted by Dorie at 8:10 PM
![]()


10 Comments:
It's a lot of work to put together a "Discussion of Methods Used" - everyone is always keen on a clear tutorial. Thanks!
what a great tutorial, and the jumper looks great (I find Boden's gradual takeover of the world a bit scary - mostly because Johnny insists on sending me a catalogue a week - so make-your-own-boden sounds the best of both worlds to me)
This comment has been removed by a blog administrator.
Very nice! Thanks for the tutorial. It is going on my list of things to do...
I only learned of Boden and its infamous catalog from posts for this latest whiplash - so cute! Thanks for the great tutorial and inspiration to do it myself.
Your jumper looks fabulous!
haha, you went to the university right? dicussion on methods used, so fun! I really like your jumper, looks great!
Wonderful! Thanks so much for your link, too- that Boden catalog- I swear I've been dreaming about projects ever since it came in the mail. Thanks for sharing!
I've used a similar technique to make cute nursing tops-- sew a little reverse applique motif in the middle/high chest, & then just cut big, big armholes in the inner shirt, for nursing. Works great, & cuter & better quality than many commercially-available nursing shirts!
Wow! This is greqat and your blog is so fresh! I put a link to this tutorial over at my Holdiay Gifts DIY flickr group I'm going to blogline you!
I was looking for a how-to on this for a swap i'm in at craftster.org. My swap partner wants an Office-themed Tshirt and I thought it'd be nice to put her fave character, Michael Scott (US version) peeking out from under there. So thank you muchly for this. I'm ready to go!!
Post a Comment
<< Home